Southern Banana Pudding Cups turn one of America's favorite old-fashioned desserts into adorable individual servings. Each cup is layered with silky vanilla pudding, fresh banana slices, classic vanilla wafers, and fluffy whipped cream for the perfect mix of creamy, fruity, and cookie-softened goodness.
The magic happens after chilling: the vanilla wafers soften slightly and absorb the banana-vanilla flavors while still giving the dessert a little texture. A cream cheese-enhanced pudding filling makes these cups extra rich and stable without losing that familiar Southern banana pudding flavor.
They're completely no-bake and easy to make ahead, making them perfect for summer cookouts, BBQs, potlucks, family gatherings, birthday parties, or whenever you need an easy crowd-pleasing dessert.
Ingredients
For the Creamy Banana Pudding
- 1 package (3.4 ounces) instant vanilla pudding mix
- 1½ cups cold whole milk
- 4 ounces full-fat block cream cheese, softened
- ½ cup sweetened condensed milk
- 1 teaspoon pure vanilla extract
- 1 cup cold heavy whipping cream
- 2 tablespoons powdered sugar
For the Layers
- 3–4 medium ripe bananas
- 1 box (about 11 ounces) vanilla wafer cookies
- 1 teaspoon fresh lemon juice, optional
- 1 cup whipped cream or whipped topping
For the Topping
- Extra vanilla wafers
- Crushed vanilla wafer crumbs
- Fresh banana slices
- Whipped cream
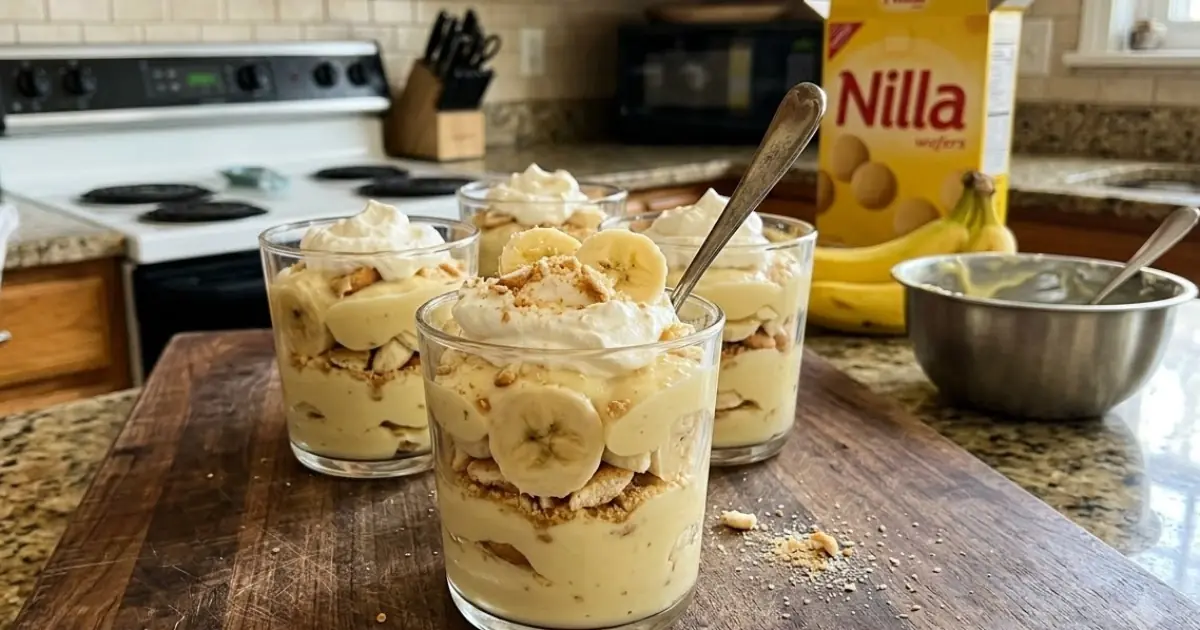
How to Make Banana Pudding Cups
Step 1 – Make the Vanilla Pudding
In a medium bowl, whisk the instant vanilla pudding mix with the cold whole milk for about 2 minutes.
Let it stand for approximately 5 minutes, until thickened.
Step 2 – Prepare the Cream Cheese Base
In a separate large bowl, beat the softened cream cheese until completely smooth.
Add the sweetened condensed milk and vanilla.
Beat again until creamy with no visible lumps.
Step 3 – Combine
Gradually add the prepared vanilla pudding to the cream cheese mixture.
Beat on low speed until everything is smooth and evenly combined.
Make It Light & Fluffy
Step 4 – Whip the Cream
In a chilled bowl, beat the heavy whipping cream and powdered sugar until medium-stiff peaks form.
Don't overwhip.
Step 5 – Fold It Together
Gently fold the whipped cream into the pudding mixture in several additions.
The finished filling should be thick, fluffy, and creamy enough to hold beautiful layers.
Prepare the Bananas
Step 6 – Slice
Slice the bananas into approximately ¼-inch rounds.
Choose bananas that are ripe and sweet but still firm. Very soft, heavily spotted bananas can become mushy in the pudding.
If desired, toss the slices very gently with a tiny amount of lemon juice to help slow browning.
Don't use too much—the pudding shouldn't taste lemony.
Assemble the Banana Pudding Cups
Step 7 – Start with Vanilla Wafers
Place a vanilla wafer or a spoonful of crushed wafers in the bottom of each serving cup.
Step 8 – Add the First Pudding Layer
Spoon or pipe a generous layer of creamy vanilla pudding over the cookies.
Step 9 – Add Bananas
Arrange 3–4 banana slices over the pudding.
Add another vanilla wafer or some broken cookie pieces.
Step 10 – Repeat
Add another layer of pudding, followed by more bananas and wafers.
Finish with a generous layer of pudding near the top.
Decorate the Cups
Step 11 – Add Whipped Cream
Pipe a swirl of whipped cream over each cup.
Step 12 – Finish
Top each cup with:
- One vanilla wafer
- Crushed wafer crumbs
- A fresh banana slice
For the prettiest presentation, add the final banana slice shortly before serving so it looks fresh and bright.
Chill Before Serving
Cover the cups and refrigerate for at least 2–4 hours before serving.
This resting time is important.
The pudding becomes thicker and colder while the vanilla wafers absorb just enough moisture to become tender and cake-like.
For a softer, more traditional Southern banana pudding texture, refrigerate the cups overnight.
Chef's Tips for the Best Banana Pudding Cups
- Use ripe but firm bananas. You want strong banana flavor without mushy slices.
- Don't use warm milk when making instant pudding. Cold milk helps it set correctly.
- Soften the cream cheese before mixing to prevent lumps.
- Full-fat block cream cheese gives the filling better structure than spreadable cream cheese.
- Don't overwhip the heavy cream. Stop when it holds its shape.
- Fold the whipped cream gently so the pudding stays light.
- Put banana slices between pudding layers rather than leaving too many exposed to air.
- Add decorative banana slices immediately before serving.
- Give the cups at least 2 hours to chill.
- For parties, use clear cups so all those beautiful pudding, banana, and cookie layers are visible.
The Secret to Perfect Banana Pudding Texture
Great banana pudding needs time in the refrigerator.
If you eat it immediately after assembly, the wafers remain crunchy and the flavors haven't fully blended.
After several hours, the cookies absorb moisture from the pudding and bananas, becoming soft and almost cake-like while still holding their shape.
For more texture, add a few fresh crushed wafers to the top immediately before serving. That gives you both softened cookies inside and fresh crunch on top.
Delicious Variations
Strawberry Banana Pudding Cups
Add thinly sliced strawberries between the banana and pudding layers.
Banana Caramel Pudding Cups
Drizzle a small amount of salted caramel between the layers and over the whipped cream.
Peanut Butter Banana Pudding
Beat ⅓ cup creamy peanut butter into the cream cheese mixture for a rich peanut-butter-and-banana variation.
Chocolate Banana Pudding
Add mini chocolate chips between the layers or drizzle the finished cups with melted chocolate.
Banana Pudding Cheesecake Cups
Increase the cream cheese to 8 ounces and add a vanilla wafer crumb crust for a thicker cheesecake-style dessert.
Biscoff Banana Pudding Cups
Replace some or all of the vanilla wafers with Biscoff cookies for a warm caramel-spice flavor.
How to Get Beautiful Bakery-Style Layers
Use clear 8-ounce dessert cups.
Pipe the pudding with a large piping bag instead of spooning it into the cups. This helps keep the sides cleaner and creates clearly defined layers.
Place banana slices against the inside wall of each cup so they're visible from the outside.
Finish with a tall whipped-cream swirl, cookie crumbs, and one whole vanilla wafer.
What to Serve With
Banana pudding cups are especially good after classic American cookout foods such as:
- BBQ ribs
- Pulled pork
- Burgers
- Fried chicken
- Grilled chicken
- Mac and cheese
- Baked beans
For drinks, pair them with hot coffee, iced tea, or cold milk.
Make-Ahead Tips
These cups are excellent for preparing ahead.
Assemble them up to 24 hours before serving, cover individually, and refrigerate.
Wait to add the final whipped cream garnish, whole cookie, and exposed banana slice until closer to serving if you want the freshest appearance.
If you prefer crunchy wafers, add some fresh cookie crumbs right before serving.
Storage
Refrigerator
Keep Banana Pudding Cups covered and refrigerated.
For the best quality, enjoy them within 2–3 days.
The bananas will gradually soften and darken, while the cookies will continue absorbing moisture.
Freezer
Freezing assembled banana pudding cups isn't recommended.
Fresh bananas can become watery and change texture after thawing, while the pudding may lose some of its smooth consistency.
Notes
- Classic vanilla wafer cookies give these cups that nostalgic American banana-pudding flavor.
- Vanilla pudding works especially well because fresh bananas already provide plenty of natural banana flavor.
- Sweetened condensed milk adds richness and the familiar indulgent sweetness found in many modern Southern-style banana pudding recipes.
- Mini clear cups are great for parties, while larger 8-ounce cups work well for individual desserts.
- These Southern Banana Pudding Cups are perfect for summer BBQs, Fourth of July cookouts, potlucks, church gatherings, family reunions, birthday parties, picnics, or an easy no-bake dessert for a crowd.